If the above video doesn’t play, please view it directly on Vimeo at this link.
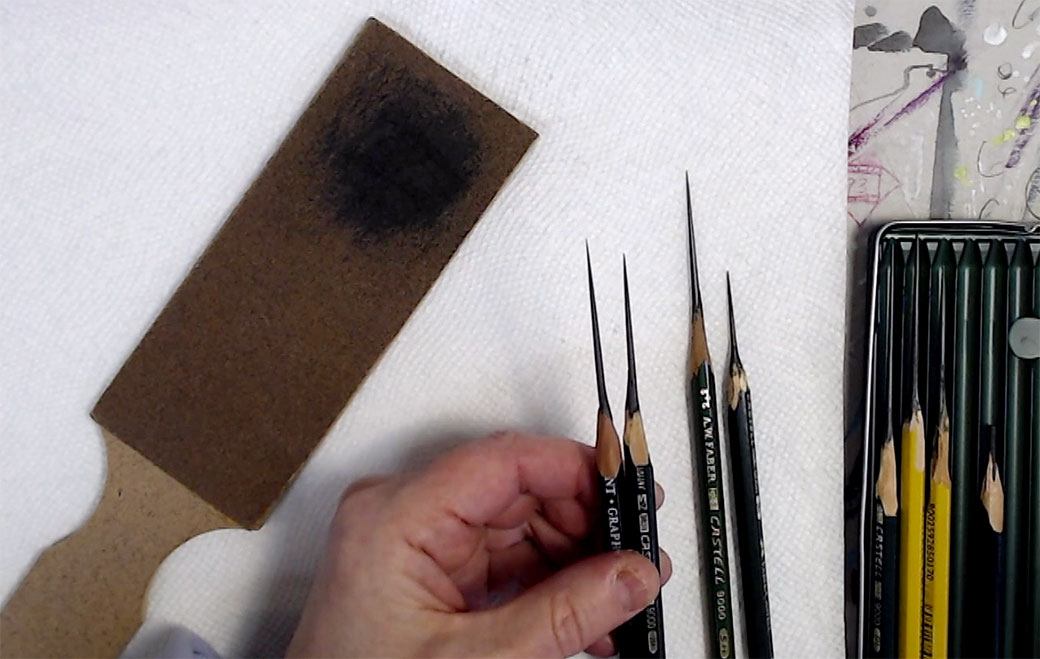
I’ve often been asked how I get an ultra-fine point on my graphite pencils. Some time ago I promised to make a quick video to show people the process.
I apologize to all my students who just had rely on a quick description.
In today’s video, which I taped in February 2021, you will be able to see the entire process.
I can’t stress enough how important it is to use a fresh blade when you start this process. I wouldn’t use a pen knife because I believe most pen-knives are too thick to use a flat/along the barrel angle that’s useful for this approach. I think you’ll see this as I get cutting.
You can use a commercial sanding block from the hardware store—you don’t need to make a board like the one I show. I would start with a fine grit to see if you can get by with that, and increase coarseness if you need to.
I wouldn’t even bother to try this with the small sanding blocks with removable sandpaper strips that are sold in most art supply stores. The paper is clogged almost immediately and there isn’t a wide enough surface to be useful. Again, you’ll see why when I get going.
I also have to add, since I only mentioned it in passing, but this type of sanding board is fantastic for sanding your vine charcoal in exactly the same way. I will routinely sharpen 5 to 10 pieces of charcoal at the beginning of a life drawing session while people are setting up. These will get me through all the quick poses to the first break and I can sharpen again, get to the second break, and then sharpen them all again and get through the final long post of 40 minutes or more.
I actually enjoy sharpening charcoal over an open bin, during model break time. It is much easier (since it’s a softer material) than the pencil sharpening, less fussy, and something you can do while catching up with friends who are also preparing for the drawing session.
I hope you enjoy the video.
Update 4.18.21 See my friend Ted’s comment below in which he discusses using a safety razor blade to get the wood barrel whittled away. I think that would be a useful way to go. AND he has some helpful tips for people wanting to make their own sanding paddle. Go for it!
















Great demonstration! I’m impressed that you can get such a long thin piece of lead for accurate drawing without using a mechanical device. Thanks for doing this!
Frank
So glad you enjoyed it Frank.
1. Please don’t wipe the blade with your finger! I was cringing and waiting for you to cut yourself, which you inevitably did. I’ve done the same with a kitchen paring knife, but have since learned my lesson. Maybe a soft brush or cloth instead.
2. Can this sharpening method be used with B-range pencils? I’ve never drawn with my H pencils because it seems so faint. I didn’t know that detailed life drawings were done in Ateliers with such hard pencils. I’ll try it when life drawing happens again.
3. I don’t understand how the grit on the sandpaper doesn’t wear out. Is it a special type?
4. Thanks for this demo!
Sharon,
1. I appreciate your concern. I was going to point out that the video makes some of the angles of my hand and the blade look flatter than they are and I’ve been doing that for 55 or more years—but I think it’s just better to say, safer to say, thank you and no one should do this. Typically, when I’m doing this process I’m over a waste bin and I tap the back of the blade on the rim of the waste bin. SO everyone needs to keep that in mind.
2. Yes you can use it with B-range pencils, even color pencils (though I don’t recommend it because of the paper getting more clogged with the waxier binding in color pencils). Just be very careful when doing this with the B-range pencils as those leads are literally softer. Too much pressure will easily break them.
As for the faintness of the H pencils, I didn’t have a piece of the correct paper there, and had the hardest lead so it wasn’t showing up well under the bright lights. But if this is something that you use multiple hardnesses of lead for—beginning with using very hard leads and very light pressure to lay in the sketch, and then build the values by moving to softer pencils which create darker values.You might never use a 9-H, and instead stay in the 2- to 4-H range depending on your needs and your vision for what you’re getting down on the page. I recommend a vellum Bristol for this type of work though you can experiment with any paper you like to work on. Heavily sized paper is difficult to build up hard pencil on. If you use that type of paper that is heavily sized, say for watercolor, you might want to stay with the 2- to 4-H pencils.
3. I don’t know why the grit doesn’t wear out. Perhaps I never used a board long enough. But I’ve had boards that have lasted me a couple years of use. Then I typically misplace my bag of life-drawing materials, throw another one together, and buy a new sanding board, only to go home and find the original bag and tools in the first place I look.
You are constantly banging the board face down on the rim of the garbage can so the graphite is constantly clearing out.
I didn’t make the sanding block and don’t know who did (it was made privately for the Atelier), so I can’t tell you more about the sand paper.
I’m glad you enjoyed the demo!
Roz
Thanks for this nice demo, Roz. It was a bit painful to watch though, so I hope it is okay to pass along a variation that I was taught that is a slightly different version using a safety razor blade that is sharper and cuts much smoother and easier than an X-acto knife (with which I have punctured myself many times too). I hope I can describe it clearly enough: First, you hold the pencil in your right hand, fingers curved around the pencil and thumb resting on the pencil pointing toward the pencil point. The blade is held with the thumb and first finger of the left hand which only supports the blade and guides the angle of attack. You hold the blade cutting edge against the pencil almost flat with the back of the blade against your right thumb which acts as a stop. With the fingers of your right hand curled around the pencil you pull it towards you against the cutting edge of the blade. The blade never moves because the right thumb acts as a stop – only the pencil that is drawn towards you with your fingers actually moves. It is important not to push the blade forward with your thumb – the only motion is pulling the pencil back towards the blade which is held steady by the right thumb. (That may seem trivial but if you ever start sharpening soft charcoal pencils you will realize the difference quickly) Obviously you can do only short strokes but every cut is under complete control. If you do a conventional whitling stroke with a knife or razor blade, you never have good control and risk breaking the lead. You would never be able to sharpen a 6B charcoal pencil with a whitling stroke because you cannot control the blade accurately and because the varying density of the wood will not allow a smooth cutting motion. And safety razor blades are cheap so use a new one each time.
Another option from a friend who did most of the Bargue drawings while attending the Angel Academy in Florence – he uses clutch type lead holders and makes 6 inch long needle tapers using a sanded board similar to yours. It seems to be a better alternative as he never has to use a blade and never needs an extender. I think the only downside here is that many of the readily available leads are not especially high quality.
As to the sanding paddle, Nitram Charcoal makes a commercial one but it has a fairly course grit on both sides and works better for charcoal, Conte pencils, and pastel pencils. I have made a couple for myself and a friend of thin 3/32″ aircraft plywood (from BalsaUSA.com), and adhesive backed sandpaper (from McMaster’com). I use 220 grit on one side and 120 grit on the other. You can also make a cheap narrow version by shortening one of those free paint stirring sticks from Sherwin-Williams, Home Depot, or Lowes. Those already have a handle chape on one end and you can cut adhesive backed sandpaper to apply to the front and back.. They are ideal for the smallest of kits. Those peel-off sandpaper strips sold in art stores are worthless.
Thanks again for the video and hope your wounds heal quickly. : )
Thanks Ted for your safety approach. It sounds great, I’ll have to have Dick demonstrate it for me, it sounds like something he suggested when he came into the studio one day and saw me working with the X-Acto.
To people reading this—Ted knows his stuff so I would try what he’s describing with the one-sided blade…
I don’t use charcoal pencils. (I have a couple and sometimes use them in the studio, but mostly just use a regular sharpener.) At life drawing I use vine charcoal and it’s a breeze to sharpening it in the fashion I just described because there is no wood to get rid of. But if one were trying to whittle away on charcoal pencils I agree that would be chancy because of the weakness of the charcoal.
Thanks also for talking about sanding paddles and how to make one. I know that will be really helpful to anyone reading this post who wants to have one and doesn’t have a source nearby.
(I’m going to add a note to the post.)
I’m all healed from the jabs and now am recovering from burns related to all the food I’m cooking these days. (I have really long oven mitts now!!!)
Ted Something I forgot, I, like you believe the “peel-off” sandpaper strips sold in art supply stores are worthless. Why are they still selling them? Why isn’t someone making a sanding paddle like this “homemade ones”? I think there is a market. It doesn’t make sense to me. Oh well. That just one of many things on the list today that don’t make sense to me. Thanks again Ted for taking time to provide an alternate safety route!
Something I forgot to mention above about the clutch holders is that you can retract the lead back into the holder when you are not using it. Also you can carry several sharpened leads in the plastic case the leads come in with no real danger of breakage. And too, there are some light weight holders available now as opposed to those heavy ones that have been so common all along.
I don’t care for the heavy lead holders either, but I’ve learned to leave with them most of the time. It is an option. I just tend to use it for other things not life drawing.
Roz, Jet Pens has a very light weight clutch pencil (or lead holder) for 2 mm leads, the Kitaboshi Lead Holder. It has a coated wooden barrel, and a button on the back end that you can click to advance the lead. You can get it with or without a clip, $9.50 or $11.50, respectively. ( the holders are identical and the clip slides off if you decide you don’t want it). I have two (without clips) that have become my favorite pencils . I used to use Faber-Castell 9400 series pencils in a couple of flat pencil boxes like in your video, but now I mostly use these Kitaboshi holders with the Faber-Castell 9400 leads. They work great for me and fit in a compact kit and I do not have to carry any razor blades or go to a trash can to sharpen my pencils. (you can also use a tiny lead pointer if you do not want to make a long taper with sand paper)
Thanks for posting these options Ted, I’ll have to take a look at them. Just unearthed my tiny lead pointer the other day!
OOPS! CORRECTION: The Kitaboshi holders with clips — the clips are NOT removable. I was mistaken about that.
Yours Roz is an impressive feat of finely shaving a pencil tip. I have the smallest Buck folding knife [2 inch blade], very sharp, that works well on various pencil woods and leads. That said, I am new to this whole business of illustration with colored and black pencils. I’m experimenting with the brands, cheap and expensive. There is the wood and the wax or graphite, etc., and quality makes the difference in how precisely one can shape the tip. Quality of the pencil and the sharpener! My one question is: why does the ‘lead’ need to be shaved clear of the wood to such a length? I’d think you could shave half the length and the finest point desired and have a more stable lead tip. And yes, fingertips bleed! Thanks for your brave demo! SWS
Septimus, I’m an amateur when it comes to sharpening pencils (and charcoal to a fine point for that matter) as I only do this when I’m at life drawing. If you shave it this finely then it does a bunch of things, not necessarily in order of importance: You hold the pencil further back and are encouraged to use your whole arm from your shoulder. You can keep rolling the pencil in your hand as you work and keep a very fine point on the pencil for a long time, not needing to sharpen as much; you can angle how you hold the pencil and use the side without the wood in the way, to make broader strokes; you can precisely place your marks because the pencil tip is now an extension of your arm and the wood of the pencil isn’t interfering with your view of that tip as you wield it (remember your hand is also way pack at the end of the pencil away from the tip so it’s not in the way either). You can use it to measure angles and proportions (a sighting tool). You can work on your light pressure work because of how you hold the pencil and where you hold it and because of the fragility of the exposed lead.When you are doing long linear shading strokes it’s easier (because of the angle, holding, and view as mentioned above). I’m sure there are more reasons that I’m not thinking of right now. Oh, and there is also the calming effect of sanding the pencil carefully. It gives you time to think about your approach, and for me builds my patience. For others I’m sure there are other reasons. Oh, and one more, the fun factor. There is something amazing about dropping a pencil like this on it’s point and reaching down to pull it out of the floor boards! Fun times.
Have fun with your pencil exploration. If you’re going to use Black pencils I really recommend Derwent Drawing Ivory Black. (The “Derwent Drawing” is the pencil line name, and the IB is the color—it’s a line of earth tones.It’s my favorite black pencil. It is not as waxy as most black color pencils, and it is a little softer than most. It is a rich, rich black.