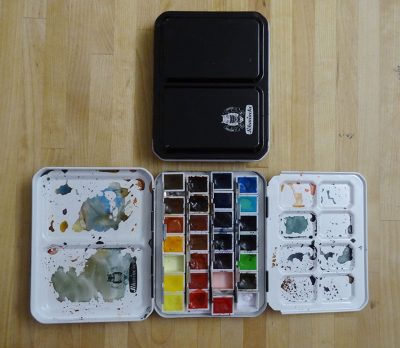
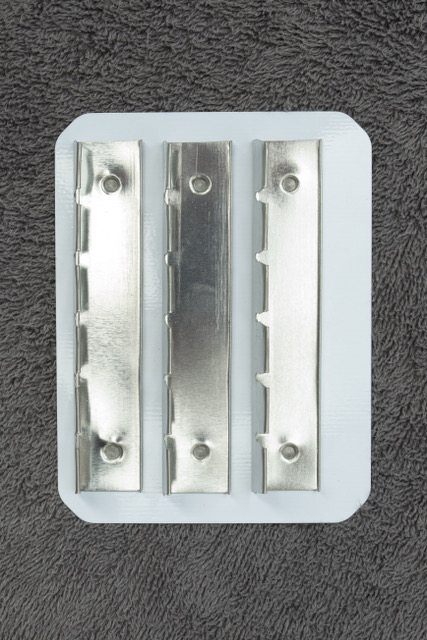
This enlargement of the holding capacity of the Schmincke metal palette box, will work with other palette boxes using the metal strip-holding-bar visible in the second photo.
As the Minnesota State Fair approaches of course I’ve been testing pigments and making choices on what gear I’ll be taking to the Fair for sketching.
Today I’m posting about adapting my favorite metal palette box to contain more pans of paint—because sometimes you need more pans.
I’ve been a fan of the Schmincke metal palette box that is not quite square since 2000 when I got my first one. The “stubbier” body of the box allowed me to hold it easily in my hand (with the thumb ring on the bottom of the box) and move quickly from paint to paint. The latter is the case because there are 3 short rows of colors instead of long rows of pans. I can hop about very quickly with my paint brush.
I quickly purchased a second “square” box and then others followed. I have one empty one stashed away so that when I get forgetful and start forgetting it when I’m out and about I have a spare. I tend to not buy and store spares. It takes a toll on the bank account. But it’s the only palette I’ve found that is this configuration and it works so well for me.
I began by creating a box full of half-pans containing Schmincke Gouache. Later I created one that contained Daniel Smith paints from a tube. After awhile I started experimenting with the Schmincke pan watercolors. They are an excellent paint for watercolorists and easy to use and replace. Besides the gouache palette I know rotate between using the Daniel Smith or the Schmincke Watercolors. I use mostly the same pigments in each box but use the carrying capacity of these boxes to test new pigments and pigment replacements.
Straight from the factory this palette is set up to contain 3 rows of pans of paint. If you use half pans you’ll be able to fit six in a row (or so they recommend) and four whole pans in the same width.
What I immediately found in my first box is that I could fit seven half pans in a row. The pans sitting at either end of the metal retaining strip would simply protrude a bit, but they were still solidly held in place.
So without alteration I knew I could get 21 colors in my box.
Look, you do not need to have that many colors with you at any one time. I routinely run about town with 8 to 13 colors in a tiny kid’s palette. I like using as few colors as I can. But when I’m testing paints or going on site for a particular subject matter sometimes I want more colors.
Because of that I started looking at ways to “hack” or alter my palette box.
Modifying Your Schmincke “Square” Box
Option One:
With my first two palette boxes of this style I went with for a rather straightforward approach to fitting more pans into the box.
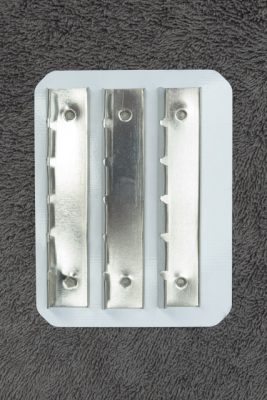
I noticed that the metal plate that holds the pan holders (see the image at the right).
By sawing off the edge on the left side of the base I increased the distance on the right side of the base when it was inserted into the box. This allowed me to friction fit additional pans in that right hand channel when the base was positioned in the box. The pans were held between the edge of the metal strip and the box edge on the left (when the base was in place). Because of the rounded corners in the box this allowed 5 additional pans to fit. So three rows of seven half pans and one row of five half pans mean I could fit 26 half pans into this box.
Option Two:
One day I decided that I could get even more half pans in the box if I eliminated the base altogether. I removed the base and affixed adhesive magnet tape to the base of each half pan. The adhesive held the tape to the bottom of the pans. The magnetic tape then held the pans to the metal bottom of the box. I was able to insert four rows of seven half-pans into that box, for a total of 28 half-pans. That’s more than enough choices to carry my favorite pigments as back-ups while testing new pigment combos. It’s the perfect size for an experimental palette box if you like to stand and paint and want to have a compact palette box.
There are some drawbacks to this “hack.” I find that over time (about a year of heavy use) that even though I allow my box to sit open at night and dry out, the moisture that gets down to the base of the box pools around the magnet tape and can soften it.
Option Two B:
Instead of magnetic tape you can use carpet tape or other double sided tapes that are weather resistant, that will not be bothered by your water usage. Simply put the tape in the box and affix the pans to the tape, or vice versa. But I would watch it over time to make sure your tape is not losing it’s ability to hold the pans in place.
Option Three:
I probably would have kept to the first two modification approaches if a friend had not written to me about his “square” palette and a method of altering the palette that he came up with. His approach needs a bit more dexterity and the ability set rivets in metal.
This is what my friend did.
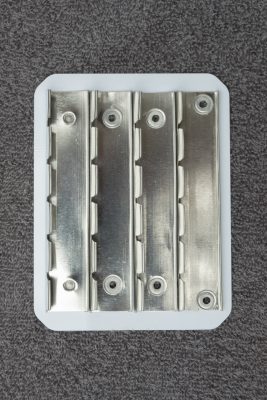
To follow his plan you’ll actually need additional boxes, because you are going to steal a holding strip from another base. I found that my very inexpensive palette boxes that were the same width, but not as wide) had strips we could use.
First leave the left metal strip (as shown in the box above) that is closest to the base’s edge in place.
Next carefully remove the other two strips by drilling out the “divots” using a 3/16″ drill bit and retain the strips for reattachment.
Next hold the second strip in place right next to the remaining strip on the left. Use a 3/16″ drill bit to drill through the sheet metal base plate (Using the existing holes in the pan strips as a guide). It turns out that the 3/16” diameter by 1/8’ long brass eyelets work perfectly to permanently secure the pan strips to the base plate. The eyelets have a slightly rounded rim. He chose to flatten them but it might not be necessary. If the pans sitting over the eyelets are at the same height as neighboring pans on the same strip you’re done! If they are sitting a bit higher, place the pan assembly on a flat and smooth solid steel surface (He used a table saw top). Use the head of 1/4” hex bolt (the head is about 1/2” in diameter) to flatten the eyelet by holding the bolt upside down and gently tapping the opposite end of the bolt with a hammer, don’t overdo it. He used black eyelets so you could clearly see what he’s talking about.
All of this was a bit beyond my abilities with shop tools so I asked Dick to handle it for me by showing him the photos my friend sent with his instructions. Dick used different rivets (because he had them on hand), but the result is the same.
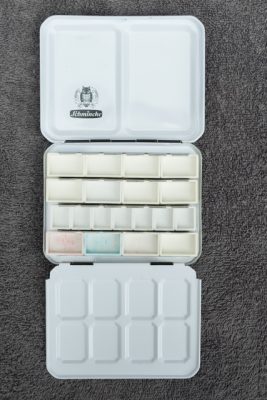
Once you have your four rows of pan holding strips in place you can load in your pans. The rounded corners of the box are cleared by all the rows so each row can hold seven half pans or four whole pans. The edge pans on the end of each row will jut out just past the holding strips, but when you bend the strips into place those end pans will remain solidly in the box. (You can see my modified box filled with half pans at the opening of this post.)
The only drawback to this method is that to change out pans you have to lift the base out of the box and remove pans from a row starting at the end, replace the pan you want to add, and refill the row, and clamp down the holding strip again.
The strips are so close together that simply loosening the fold-over bit of the holding strip doesn’t allow you to lift out the pans. There simply isn’t room to maneuver your fingers in there to lift them out. But that’s a good thing as you know they are going to stay in even if you drop the box. (This isn’t always the case with the magnetic tape method as it depends on a quality magnetic tape not bothered by water. Even the friction method I first devised can fail if you get knocked hard and your box goes flying.)
I think what my friend came up with is rather marvelous and I recommend it to you.
Availability of This Box
It used to be that you could walk into a store and buy one of these boxes EMPTY. It’s about 5-1/8 inches wide x 4 inches tall. (The depth of the box is less than an inch as it only has to hold the pans.)
Then Schmincke stopped selling the boxes empty. My heart sank.
But recently they did a new watercolor set with Wet Paint and Wet Paint used that box to contain the set. (That’s when my friend bought a couple of these “squares.”)
The sad news it that particular set is sold out and Schmincke is still not selling this box empty again.
I’m writing the post basically for the people who bought that boxed set.
But I’m also sharing these instructions for modification with you because I believe Schmincke may sell this box in the future. Several years ago when they wanted to do a commemorative box they released this palette again (it has a colorful painted top that I don’t care for, but I bought one because I wanted a spare).
My advice to you is if you want to have a box like this keep your eyes open for other sets that might be sold in the future, or for a re-release of this box.
What Types of Pans and Half Pans Will Fit This Box?
If you’re one of the fortunate folks who purchased the recent pan set and you want to modify your box you need to remember that Winsor and Newton half pans are not the same size as standard half pans and Schmincke half-pans. They are smaller and don’t fit well in the holding strips.
Note: In the 1990s I bought a Cottman set of watercolors from Winsor and Newton only because I wanted the white box the paints came in. The trouble was I couldn’t insert my own pans because they didn’t fit in the box so I had to save the Winsor and Newton pans that came with the box, jettison the actual paint which was student grade anyway, and then hot melt glue the pans into place (because once you removed their wrappers the pans didn’t sit firmly in the box but easily fell out). Then I filled the pans with Daniel Smith watercolors. I did add a couple Schmincke pans to that box initially, but they were attached where the water “well” was stored, because I didn’t use that feature. You can see that white plastic box in the top image of this post on travel palettes. In that photo you’ll also see two of my modified Schmincke palettes and my two small children’s palettes I always carry, along with another small metal box from China.
But many vendors sell empty half-pans and I have found that all the generic half-pans and the Schmincke half-pans (as well as the whole pans of both types) will fit in this box. Just be sure that you lay in a supply. Often pans seem to be unavailable when you need them most.
I like to keep a supply on hand so that I can fill a pan with tube colors and insert it in a box and go off with some different pigments on any given day.
I have found that the Whiskey Painter’s Palette’s half pans work in this palette.
I hope that whether you’re adapting your current painting box or a Schmincke box that you’ll find these approaches helpful either to complete a modification or to think about new strategies for modifiying your palette.
Realistically we don’t need 28 or even 21 colors. But there are times when you are experimenting and testing new pigments when it so helpful to go out to one site and spend the day sketching image after image with one set of pigments, then doing a series of the same subject matter with a different range of pigments, such as different blues to see which different neutrals you can get with the different complementary colors you’re carrying.
It’s so much more satisfying comparing apples to apples—or in this example, puffin sketches with other puffin sketches using different pigments. You can compare on site which variations you like the best compared to the subject before you. And you can also get immediate feedback when testing those pigments on site. And the other testing circumstances remain the same (unless the weather dramatically changes and the light shifts).
I just find it so immensely helpful to have that real-time feedback. It keeps me moving forward.
I hope you have a great time with your own experiments!














This is a timely post, Roz. I agree: I appreciate the value of a limited palette, but sometimes one just wants more colors. I have the Schmincke 12-half pan rectangular box that I think could be refitted in the same way, although I don’t know if I’m brave enough to try! I have seen a version of the almost-square box, labelled as the Anniversary Edition. It has a porcelain insert, but I can’t tell from the photos if it can be removed. If it can be, the pans would probably have to be secured with tape, as in your first two options. Still, it would be nice to have the almost-square box. I saw one on eBay and on Pegasus Art in the UK. I think it might actually be less expensive to order it from the UK. The one on eBay was over $100.
I searched for the anniversary Edition you mention. I would not spend money for that. It will be heavy, things will fall out of it (I read a review that the porcelain thing doesn’t hold the pans well).
I suggest you look into the Whisky Painter’s Palette that I mentioned to Suzala in this same comment section. You can use my search engine to find my review of it and see it in a little video. Also if 12 colors aren’t enough for you (which is what fits in the small one) you can get the larger one https://www.amazon.com/Whiskey-Painters-Additional-Customizable-Measures/dp/B00EJRJFP6
It holds 16 half pans but if you put 8 more in the center area you have 24 colors, that’s almost the same as in modification of the Schmincke box, only 40 bucks at the link I sent, and it’s a sweet small box that might be a tad wider than the Schmincke box we’ve been discussing, but it isn’t as deep as far as rows go, so it’s probably easier to hold in some respects????
Roz. Great read. I have been jamming more pans into my standard “small” tin by removing the tray and using a bit of blue poster tack to hold in the pans. After several months i still have no water issues. And yes, none the less, I am sorry i didny buy the wet paint sq schmiencke palette cause, sometimes a girls just gotta have more…
Suzala thanks. I have friends who use poster tack and other such items but since I don’t know how it lasts over time and I’ve never tired it because that stuff smells to me. But it’s good to know that you’ve been using such a modification for months with no issues!
I recommend that you sign up for the Wet Paint newsletter, because they do different sets a few times a year it seems. Of course there’s no guarantee that they will use this tin again. (I don’t know how they arranged it with Schmincke.) But you never know.
Also, if you find the two row box which is about the same width but only has two rows, you can adapt that with the rivet method to hold three rows. You would need an extra box to pull the extra strips from. You could buy an inexpensive box of that size and use one. I got strips out of one of mine that was just an off brand I found on the internet. I’m embarrassed to say that the studio and the TV room are in such disarray (framing paintings, putting projects away, reshelving books, etc.) that I don’t know where that one has got to, but I think I got 21 colors in it (half-pans).
Something else to think about, and you can search on my blog’s search engine for my post about it—the Whisky Painter’s Palette. It’s compact and doesn’t have a lot of mixing area, but it has a really cool system for holding the pans in place and in their small box I was able to get a third row of pans in the middle row. I don’t have one handy but I think that brings it up 12 colors, and even that is typically more than I need. It’s a fabulous little palette and easy to maintain and switch out.
Looks like Dick did a great job with the four strip modification in time for the fair! Having your field kit just the way you like it makes for a more efficient and pleasurable plein-air sketching experience, ENJOY!
Looking forward to seeing your colourful sketches from this year’s fair😀.
Thank you Paul, I love the new box altered this way!!!! Now there is much more to set up. A little platform to go on a monopod. I have never used anything like that but I simply can’t use real brushes while standing and sketching if I can’t bring my water up to the same level as the sketchbook. We’ll see how it goes. We have little time—the Fair starts next Thursday and the sketch out is Saturday (and Monday if people are reading and wondering). I would like to field test it but that would mean we’d have to do something today and that’s out, so maybe if we can get it done on Sunday I can do a test on Monday or Tuesday while running errands. And then tweak it??? EEEEE. Time is going by too quickly.
May just have to use the new box with a waterbrush at this years’ fair?
Ack!!!!!!
Thank you for this info Roz! I (im)patiently waited since the first time you mentioned the square box so I am so happy to finally know how you did it! You are such an inspiration – thank you for sharing so generously. I have been a fan since you first appeared as a teacher in Sketchbook Skool. Thanks to you, I have spent countless hours in museums sketching away!
Thanks for the patience Lorraine. I’m also so glad that I got you into museums to sketch! You keep at it and good luck with any modifications you do with your paint palettes!
Roz – Like Lorraine, I have been (im)patiently waiting for this post, as you know because I emailed you. But actually it’s right on time, because I am also (im)patiently waiting for my back order of experimental colors from Wet Paint.
I had planned to use magnet tape, but now I may experiment with rivet setting. Very exciting! I also appreciate the information about empty pans, as I am a Daniel Smith fan.
Now I’m off to read your always-entertaining chicken and Minnesota State Fair posts while I wait. Thanks!
Thanks for your patience Karolyn! I’m glad you found this helpful. I hope you try the rivet approach because I love how it transformed my new box into something so rock solid with no reliance on friction fits.
Enjoy the chicken notes! Hope you get to sketch some chickens yourself!
Hi Roz-
Thanks for sharing your modifications to your box. I got one of these lovelies from Wet Paint while they had them. As soon as it arrived and I saw it in person, I knew I should have gotten two, because as you say, gouache, but of course they were sold out by then.
Except where they’re not- this set wasn’t exclusive to Wet Paint it seems, but was put together for IAMART member stores (iamart.org), so it’s possible someone could track one down still. I just got my second one from Da Vinci Art Supplies (https://davinciartistsupply.com). Good luck to anyone looking to hunt one down; they are pretty fabulous!
Actually the set was developed by Wet Paint and one can quibble about the exclusive. Wet Paint has certain exclusive rights with them.
IAMART is something that Wet Paint belongs to. In the past I know that Wet Paint has combined with others in that organization to put a set together an order to make the numbers needed to get the set made. Then Wet Paint sells the bulk of them and others in the group can have some for their shop.
But Wet Paint as the instigator of the set to which you refer committed to the largest number. There are some people in their independent buying group (who often don’t advertise on the internet) who may still have a set. Contact [email protected] if you are still looking for the recent botanical set and they can help you find a vendor who still has stock.
But please no one waste a moment trying to track one down by searching on line. Many of the smaller dealers don’t even list the few sets they get on their website.
Your time is better spent sketching and painting with what you have.
Instead of searching online simply get on the Wet Paint’s mailing list so you get a heads up the next time they do something like this. Wet Paint is also creating a list of interested customers for future sets.
I too am fond of the metal palettes but dislike the “trays”. I stretch a thin layer of off- white Museum Mount/earthquake putty across the bottom of the container, then place the half and whole pans of WC on top. I’ve never had a pan to fall out since it is much more adhesive than other “puttys”.
Sounds like a good way to go. Most putty products smell too strongly for me. I hope people who don’t have this issue give earthquake putty a try! Thanks for bringing it up.
You can easily buy empty Schmincke tins in Australia so simply go to websites like Parkers Art Supplies and order one online, plus, if you’re shopping with USD you’ll like the exchange rate in your favour with AUD.
I’ve bought a Schmincke tin for 15 x 5ml tubes and want to remove the fixed internal metal divides so I can fit half pans and full pans so I can take a broad range of colours on road trips. I just want to remove the rivets neatly so the tin isn’t damaged. Maybe I should just be bold and get the drill out and give it a go. 🙂
You may be worrying about something that isn’t a worry. When Dick (who did my palette) and Paul (who got us thinking about this) did the drilling to remove everything looks really neat and tidy. There wasn’t any damage to the tin.
I don’t like to use drills, which is why I asked Dick to do mine.
Hope you find something that works for you.
there is a new Schminke square palette @ Jacksons till June 22nd 2018 with 18 colours pearls and metalics…same square palette…ya they are cool…
I didn’t know they had pearls and metallics Janis. I don’t see those in their catalog. I’ll keep my eye open. Thanks for the heads up.
I’m looking for this palette online but can only see the one that comes with the porcelain tray, I wonder if it’s the same exterior metal box though? As I could remove the porcelain and simply put my halfpans with tiny magnets but just want to make sure they are the same size… great review !
Mara, Blick sells some https://www.dickblick.com/products/schmincke-empty-watercolor-tins-and-pans/
The one you see in my post isn’t typically sold empty. They sell it as the holder for specialty paint sets as you’ll read in my posts about it.
Other companies sell the same style box to which you can do the same conversion, though depending on how large the box is you may not get as many rows. Here’s a box from another company that I routinely alter to hold three rows of pans. https://www.blueroosterartsupplies.com/Artist-Watercolor-Metal-Box-Small-p/blu012p.htm
You’ll just have to google search for Watercolor palette boxes and find some in your price range and area.
You can of course use magnets on any box that is metal, if the magnets can be glued to the pans, or have a self adhesive. I’ve done that to some of my boxes. See my option 2 in the post. I don’t like it as much as the adhesive wears out over time.
What Paul came up with involves a little more effort, but it is so solid and wonderful that I don’t think I’ll ever do anything else.
I was searching to find out what made this pan so darn noisy and then realized that auto-correct had triumphed over us again. “A closed, not quiet square box from Schmincke”
Arly THANK YOU for catching that. I’ve gone in and fixed it! The only thing that makes this box noisy is if you get knocked over (by say a goat who doesn’t want you in the yard) then it makes quite a clatter when it hits the ground!!!