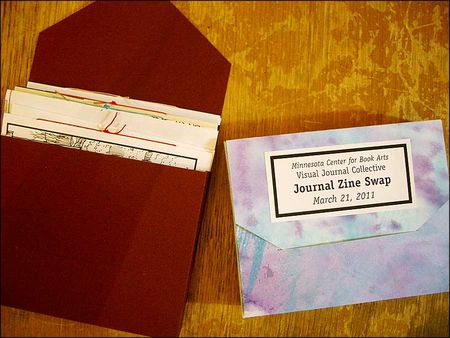
Above: completed journal zine case. The open maroon case with journal spines sticking out, is made with Murano paper, the painted case was made with a sheet of pre-painted 140 lb. Fabriano Artistico watercolor paper.
After the March meeting of the MCBA Visual Journal Collective, when we exchanged our Journal Zines and made a case for our zines I wrote that I would post instructions for the case. Here are some photos and instructions. The instructions assume that you have a working knowledge of folding and scoring with your bone folder and can determine paper grain direction.
Shameless Self Promotion: If you don’t know how to measure and mark and score and fold your paper then I recommend that you sign up for my FREE visual journaling class at Strathmore Paper. (Click on workshop logo at the bottom left of their homepage and then click on register—it’s FREE. Next find workshop 3 which is mine.)
In one of the lessons I demonstrate how to mark, score, and fold paper for a journal page fold out and all those skills are applicable to making this case. In addition, I talk briefly about using a triangle, so if you don’t know how, seeing it in my hand and in place, might help you understand the discussion of triangle use below.
Did I mention the workshop is free? The workshop begins on May 1, 2011.
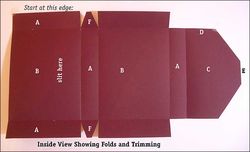 Left: View of the inside of the case, with labels to use when following the instructions below.
If you zines are the size ours were (4.25 x 5.5 inches) you will need to determine the size of your stack or “spine” width of your box (measurement A in the photo).
You can stack your zines together and measure them with a ruler as you hold them slightly compressed (but not tightly so or it will be too difficult to get your zines in and out). I prefer to use a measuring strip—a strip of paper with trimmed edges that you align with the object you’re measuring and mark off the width, height, etc., right on the strip. Then you don’t have to mess with a ruler and small increments on the ruler. At MCBA we have a box of cut strips always ready to act as rulers. I recommend that you take this practice into your own studio.
However you determine it, you’ll need to know the thickness of your stack. If you are new at this and unsure, I recommend that you make a case with inexpensive paper first, to get the hang of it, and then use that as the model to build your final case, adjusting the measurements as needed.
Besides the thickness or spine, you’ll need your width and height measurements. To make sure these measurments work with the folding of the case you need to add 1/16 inch to your measurement. With thicker papers because of the extra bulk when folding things in at the base of the case, you might need to add 1/8 inch. Again, another reason to make a mock-up first.
I put all my measurements on my measuring strip. I begin at one end by writing BOTTOM (but you could write START—it’s where all the measurements start from). The measurements are marked as tick marks and labeled, H (for actual height), H1 (for the plus measurement needed), W (for actual width), W1 (for the plus). Two marks labeled S which indicate the start and finish of the spine are made at the end of my measuring strip. When I write height or width below I intend you to use H1 and W1.
If you are using a ruler, simply note down your measurements.
The first thing you need to do is cut a piece of cardstock or other heavy weight paper that is 16 inches wide x 9 1/2 inches tall (if your case is sized like ours was; note if your spine is thicker you’ll actually need more height). The grain should be parallel with the height (9 1/2 inch side).
If your zines, or cards, or book that you are making a case for isn’t the size of our zines you can use this formula to work out your starting sheet size.
WIDTH = (3 x item width) + (2 x item thickness, e.g., if it’s a book you want 2 x the spine width) + 1 inch cutting waste
HEIGHT = Height of object (e.g., if a book then it’s the spine height) + (2 x item thickness)For example, you want to make a packet case for some journal cards that are 6 x 4 inches (w x h). And you have a stack of cards that is one inch thick. (That will be your “spine.”)
Width = (3 x 6) + (2 x 1) + (1) = 21 inches
Height = 4 + (2 x 1) + (1) = 7 inches
Bring a piece of suitable cardstock that is 21 inches wide x 7 inches tall.The grain should be going in the same direction as the height.
When selecting paper choose one that folds well in either direction, both with and against the grain. I set up our case so that the tallest side would be the height, and the grain would go in that direction. You could just as easily do it the other way. I wanted my case to open at the spine of the zines so that it would be easier to reach in and pull them out.
If the paper you’ve selected cracks when you fold it against the grain I recommend that you select another paper. Think also about how your flap will fold. If it is going to be opened and closed frequently make sure the folds run with the grain as they do in my example.
Start with your paper strip in a horizontal orientation as shown. The top edge of your sheet should be cut straight across the top. Using a ruler or measuring strip (MS) position measure your spine width from the top of the sheet down (you’ll be creating that flap A across the entire width of your sheet). Make a mark. Move over about 7 inches or so and do the same thing, measuring from the top of your sheet. Now position your ruler so that they connect the two points you’ve just marked. Score your paper with the bone folder (edge not tip)—by running it along the metal ruler’s edge. Before moving the ruler, reach under you sheet and start to fold it up, against but not over the ruler, to state that fold. Remove the ruler and complete the fold with your bone folder (one swipe, don’t shine your paper).
Now with your ruler or MS measure from that fold, downwards, marking your Height. This is the height of the panels labeled B. Do this at two points along that first fold and then make your second fold at the base of that panel, where you see it in the diagram. Your fold will extend across the entire width of your sheet.
Next using that last fold as your starting point mark your spine width again at two points as you did at the top, you are making the bottom panel A in the diagram. Use your ruler to TRIM off the excess at this point across your entire sheet, leaving only the thin spine fold tab that is the same as the top tab along your sheet.
Now you will begin to work across your sheet from the LEFT to the right. Beginning at the left, use a ruler or MS to mark your WIDTH. This will fall at the right edge of the first panel labeled B, just before the first vertical panel labeled A.
If you know how to use a triangle, align the top of the triangle with the straight edge of your sheet at the top and the perpendicular side of the triangle with your mark. Score vertically through your mark, fold up your paper to start the crease, and then remove your triangle to finish the fold.
If you don’t know how to use a triangle use the two dots method again. Measure along your first fold from the left edge, and mark your width. Then do the same at the bottom fold. Connect those two marks with your ruler, complete your fold as before.
You are now at the vertical left edge of the first vertical A panel. Measure your spine width, and score and fold. Next meaure your width and score and fold. Next measure your spine width and score and fold.
You are now at the left edge of panel C. For the width of panel C taste and some experience comes in. You want your flap, which is what this is, to come over enough of your cover that you can insert the flap into a slit on the corresponding side of the case. For our purposes I made flap C 3.5 inches wide. Mark this width using a ruler in 2 points or a triangle and CUT off the excess.
Next you will return to panels marked F. Cut as shown, with straight cuts on the sides, following the line of the vertical spine fold; then angle in from each panels corner towards the center. How much you cut will depend on the paper you use. Thicker paper will need more cut away to allow for easing.
Now move over to the RIGHT where you have your last vertical panel A. You want to trim your sheet up and down from the left edge of that panel, getting rid of the horizonal strip A that extends at the top and bottom there. To complete this move you also want to cut horizontally, along the first top fold you made, left from that same starting point to the right edge of your paper. This makes the cutaway you see just above D, and also at the bottom of the A+C panel.
You will still see C as a rectangle and you have to fix that now. Find the CENTER of your paper at the right edge of your paper, where E is located. Mark 3/4 inch above and below the center mark so that you will have a 1.5 inch space that is centered on that side. At the top and bottom of your flap, where D is at the top, and in the mirrored position below, measure 2 inches from the right fold of A towards E, along that top edge or bottom edge. Mark it, both at the top and bottom.
Align your ruler so that you connect the mark at D and just above E. Cut away the triangle of paper to make the edge of your flap point. Repeat at the bottom of your flap, using the mark 3/4 inches below the center mark at E.
Now you need to cut your slit. Fold up the case into its final position, with the flap over the panel at the far left. Try to hold it all together as exactly as possible. About .75 to 1 inch up from the base of the flap make a dot with your pencil at either side of the flap. Once the slit is cut you flap will insert into the slit .75 or 1 inch just as you have marked it. Unfold your box again and cut between the two dots, making your slit.
At this point it’s time to adhere your labels so that you can weight your case while the glue dries. I use UHU Gluestick.
 Left: Case showing the labels in position, and the cut slot.
In writing these instructions I realized that if is difficult, without multiple step-by-step photos to show the folding and gluing of this case. I have made a video of the gluing procedure so that you can watch as I glue it up and fold in the various flaps. The video appears at the end of this post. There are a couple things to remember when gluing:
1. It is important that the side flaps alternate in direction. When holding the case with the closed labeled flap towards you on the right you will have a folded edge facing you, and on the left you will have a cut edge point at you, on the side panels. (Or vise versa.)
2. The triangle flaps on the spine need to be positioned BETWEEN the longer panel flaps. They should also be glued into place as shown in the video. This is an important step in keeping the case edges square in relation to each other (i.e., keeping everything at right angles). If you glue your panels wonky, your box will be wonky. It will be difficult to get things in and out, and it won’t close properly.
3. Be sure to add your labels and make your flap slit while your case is still flat!
4. When working inside the case to press the edges together, if you cannot get your fingers inside use the rounded end (not pointed) of your bone folder to reach in and press down. I start to say this in the video and then I get distracted and don’t say bone folder!
If the video which follows doesn’t show up embedded please go to “Roz Stendahl_Zine Case” on YouTube.







I cannot enlarge the image of your finished folder. I have clicked on it and it remains the same small unreadable image.
I’m sorry. This is a post from my website and the images aren’t expandable unless I go through all 2,100 posts and over 5,000 images and reenter each of them. It’s not something I can do at this time. Please try to see the image more clearly by using your browser window enlargement (on Mac it’s command and the plus key), or watch the embedded video. That will make things more clear for you. I’ll add this to my list of “fix first” blog posts.