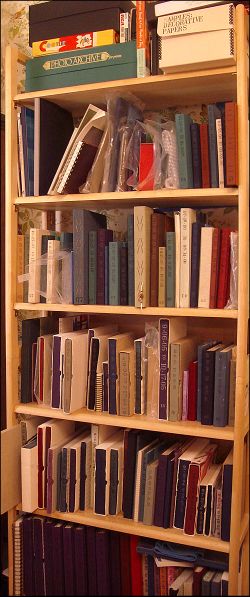
 Left: Photo of shelves with some of my recent visual journals. If you count down shelves from the top shelf where you see the “Cootie” game to shelves 4 and 5 you’ll see a lot of journals with slipcases. These are made with various cardstocks, corrugated cardboard (archival, found in a scrapbooking store), and painted watercolor papers (140 lb. weight).
After selections from my journals appeared in Danny Gregory’s An Illustrated Life: Drawing Inspiration from the Private Sketchbooks of Artists, Illustrators and Designers several people asked me what type of questions readers of the book asked when they met me or contacted me via email or post.
The number one question people ask is “What do people ask?”
The next most frequent question is a series of questions all relating to media and paper. I tend to be interested in testing art supplies and this came across in the podcast interview Danny did of me as well so people like to ask me about materials and tools.
The surprising question, next in frequency, doesn’t have to do with my journal work at all, but rather relates to the physical journals themselves.
Danny included a photo of a shelf in my studio where the recent journals are kept. Ninety percent of the people who contact me about my work in Danny’s book ask the following question: How do you make slipcases for your journals? (or What are your slipcases made of?)
I thought it would be helpful to write about these cases, especially since a recent post about “unbound journals” raised some questions about cases.
First a Caveat
Currently I rarely make slipcases for my journals. The exceptions are softbound journals (I teach several classes in which students make a softcover, multisignature book and a slipcase to protect their book); special journals such as the State Fair journals still have a slipcase (but typically these are more elaborate and made of binder’s board and covered with fabric); or unbound journals which are made up of loose pages.
In the past I made quick and simple slipcases for my journals because the cases protected the journals when I was out and about—all that carrying around in my backpack. In the summer of 2006 I went to Paris with a slipcase-covered journal and 30 minutes on the ground in Paris I crunched the slipcase up and tossed it in the nearest bin. My pack was too full of “essentials” and to take the book out, take off the case, put the case back in the pack while I quickly sketched something—that wasn’t waiting for me—well you get the idea. It was more of a liability than a help.
I have archival plastic bags that I place my journals in when I finish binding them. I still carry them around in those bags. The bags are easily stuffed in a pocket when you’re painting, and handy when you want to quickly get the book covered from rain. Anything more seems superfluous.
Getting Started on Your Slipcase: Tools and Materials
If you want to make a simple and quick slipcase for your journal, whatever your reasons (aesthetic or practical or whimsical) you can do so with only some cardstock, a bone folder, straightedge, X-Acto, a pencil, some PVA, and a strip of paper for measuring—that’s right, you don’t need a ruler.
The method I use is so quick that I don’t even get a glue brush out. I simply pour a small amount of PVA on a sheet of waste paper and use my finger tip to apply the glue. When I’m done I toss the waste paper and all the clean up is over.
To make a slipcase with cardstock you must first find some suitable cardstock. I recommend that you use acid free cardstock, as it will be in direct contact with your book. If you used archival materials for the book it would be foolish to store it in a non-archival case. Any paper store will have suitable cardweight papers. You might opt for a sturdy handmade paper as grain direction will not be an issue. As for papers with a grain, you’re left with a dilemma. You will be folding the paper both horizontally and vertically so at least some of your folds will be against the grain. Make sure the paper you select doesn’t crack when folded with the grain. When I used archival corrugated cardboard (of the type used by scrapbookers—not the type shipping boxes are made of!) I would always have one direction where the corrugated ridges would crack—but if you use your bone folder carefully when folding such cardboard you can control the cracking so that it still looks neat and tidy, as opposed to crushed or torn.
Some watercolor papers also are useful for making slipcases. Unlike decorative corrugated cardboard where the corrugations actually provide some protective “padding” watercolor papers simply provide a decorative covering and protect the book from abrasion. When using watercolor paper for slipcases I like to paint the paper with acrylic paints before cutting and folding. I will stretch a sheet on a watercolor board, using either tape or staples, paint the paper, allow it to dry flat (the tape and staples make this possible). When it’s dry I release it from the board and cut to size and fold. When working this way I am careful to keep my paint applications watery, to avoid impasto paint passages which would be difficult to fold. (If you do have a small area of thick paint you can always carefully cut into it with an X-Acto, along the fold line, going only deep enough to cut the paint surface, but not through the paint and cardstock. This will allow the paper to fold. Realize that this spot on your case will be more vulnerable to wear, i.e., the paint may peal off here.
Test your watercolor papers first to see if you can fold them easily without cracking. I find there are several brands that work. I find that Arches is not suitable because of the heavy sizing; however if you prewet and stretch the Arches you may have good luck folding it. When I treat Arches that way I’m able to use it to make decorative paper to cover book boards, so it would also fold well on its own. The prewetting probably removes some of the sizing.
You might also want to use a thicker weight drawing paper and double it to increase thickness. I do this when I want to cut a window in the slipcase and have a “backing” to that window, onto which I can place an image. The backing is simply an extension of the paper folded back on itself.
As you can see there are a number of ways to go with paper choice and the idea is to explore them and find out what works for you. For a time I was able to get archival WAVY corrugated cardboard that was translucent. That was great fun to use because you could see the book through the slipcase. I would check scrapbooking and paper supply stores to see what is available and appealing to you.
Tip: Obviously the size of your paper sheet will matter. For an 8 x 10 inch book with a 1-inch thick spine you will need a sheet of cardstock that is 17 inches wide and 12 inches tall—minimum (you actually want more than that because you want to trim straight edges.
The St. Armand Mill in Canada makes lovely handmade papers that have the correct heft for slipcases. (I purchase their papers locally at Wet Paint.)
In general, when selecting a handmade paper I avoid those with plant inclusions. The acidity of those inclusions is unknown to me, but more important, it is very difficult to make a clean fold in a sheet of paper when a thick stem or seed is jutting out of the paper. Don’t give yourself those headaches.
Construction Tips
Measuring—
I mentioned you don’t need a ruler to make a slipcase. What you need is a book that you want to encase and a strip of waste paper to use as a measuring tape. Make a mark on your paper strip and label it “A” or “start” or whatever works for you. Hold your book so that the head or tail is facing you as you look down. Place the strip so that your first mark aligns at the outer edge of the front cover board. Make another pencil tick mark where the outer edge of other cover board falls. Do not squeeze your book too tightly or your measurement will be off. Check the measurement by moving the tape up and down along the head or tail. Also hold this measurement along the width of the spine and at the fore edge of your book. These four areas are all your “spine” width as far as the case is concerned. You want to have a little bit of space so that the book will slide in and out easily, but you don’t want your case so loose that the book falls out when you pick up the case.
Please realized that if you were standing next to me I could point out “tolerances” which would take pages and pages to describe. My best advice is that you make a case, keeping careful note of which approach you took, slightly too loose, on the tight side, etc. After you’re finished you’ll be able to judge where you need to make adjustments in future cases. There are so many variables to the construction (as you’ll see in a minute) that you will have the best results if you approach it with patience and precision. After making one or two slipcases you should be able to cut and construct a case in less than 10 minutes.
Note: If your journal is unfilled when you make the case, realize your book will change as you work through it. For some people their books will start to bulge with collage materials. You’ll need to make looser cases into which your book grows, or you’ll make your case at the end perhaps when your book is filled?
The measurement on your strip should be labeled “spine” and you will later transfer this to your cardstock. You will also measure the height and width of the book in the same fashion—making two marks on your measuring strip. Keep them labeled. When measuring the height, mark at the actual height and then add 1/16 to 1/8 inch additional depending on the thickness of your cardstock, as you will be folding multiple layers at the head and tail and will need extra space there to allow for a fit.
Note: In the 1990s Denny Ruud, an extraordinary bookbinder and calligraphy artist (go and look at his website to see his stunning work), taught me to use measuring strips when I was making books. I have been grateful everyday since. While using a strip of waste paper in this way may seem odd at first, you will soon come to view it as more exacting than trying to break sixteenths of an inch into thirty-seconds and so on. Having a “custom” ruler is much quicker and easier to read and work with. Also, in areas where measurements bend such as on a rounded back spine, this is a simple way to get an accurate measurement to transfer (without calipers).
Scoring—
In order to fold thicker papers and cardstocks you need to score a line along which the fold will happen. To do this you need to use your measuring strip to mark the points of your line (this will be explained tomorrow with a diagram); position your straightedge to create a straight line running through the two points; take your bone folder and run it along the straightedge, connecting the dots, creating an indentation along this “line.” You should use the narrow edge of your bone folder but not the tip. If you use the tip you might push down into and tear the paper. This is especially dangerous when working with corrugated boards—score on the non-corrugated side, gently.
Be aware that the bone folder has a width! Measuring is important for fit in this process. If you place your straightedge right on the two points you are connecting and then use your bone folder to “draw” a line, depending on the width of your bone folder you may find your score line is actually 1/16 inch or more over from your measuring marks. Practice scoring on waste paper first, so that you know where to position your straightedge so that when you run your bone folder down along it you actually connect your measuring dots, instead of increasing or decreasing the desired space. Imagine that you did this at every fold, you would end up with a drastically tight or loose case—or a misshapen one if you were haphazard about how you positioned the straightedge and bone folder.
Proficiency at this skill is key to creating a good slipcase, so practice, and be consistent.
Also, very important—when you score a line, DO NOT MOVE YOUR STRAIGHTEDGE when you are finished. Keep it in position for the start of the next important step: folding.
Folding—
After you have scored your folding line, but while the straightedge is STILL IN PLACE you want to put down the bone folder and with that hand lift up the edge of paper you have just scored, scooting your hand under the paper and lifting the paper up against the edge of the straightedge, essentially starting your folding process.
If you move the straightedge before doing this you have to realign it and that can be impossible with some papers and in some lighting conditions. Starting to fold in this way will ensure that you stay on the indented line.
DO NOT FOLD YOUR PAPER OVER THE STRAIGHTEDGE! If you do that you’re getting a rectangular crease that is the thickness of your straightedge. No, all you want to do is ease your paper up against the edge of the straightedge to no more than a 90 degree angle.
When this has been accomplished along the length of your indentation, remove the straightedge and flop the portion of paper you’re folding over, completely over. Starting at the bottom of the fold press firmly with your bone folder (I use the narrow edge of mine, some people like to use it flat), and push up along the crease to smooth it flat. If you aren’t happy with how flat it is, you can push in a downward stroke along the same line, however, if you do more that than you will create polish marks on your paper. (Practice will allow you to do it in one motion.)
If your paper is heavily textured, like corrugated cardboard, then you might want to place a clean waste sheet over the fold before you press it down with the bone folder.
Using a Triangle (optional)—
Some people like to use a triangle to drop their vertical lines down from their first cut edge. If you do, be sure that you base align it with your first cut edge on the paper (the line you cut first, as explained tomorrow) AND that you take into consideration the width of your bone folder when you score a line using the triangle. Same rules apply as when using a straight edge.
Cutting with an X-Acto—
When cutting along the edge of a straightedge make sure to keep your blade perpendicular to the paper (at 90 degrees to it). If you angle your blade you are actually cutting off a narrower or wider measurement (depending on your angle) than you intended. Also when cutting decorative corrugated cardboard be sure to use a fresh blade and hold the tip flat to the paper so you don’t drag and tear the fibers from corrugation to corrugation, but instead cut through. You’ll get a feel for this after some practice cuts on waste strips.
Making the Slipcase
Tomorrow I’ll have a diagram for folding and cutting so you can put these tips and methods to work on your slipcase.

