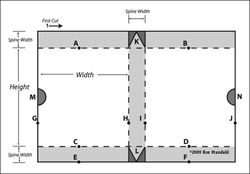
 Left: Diagram showing a flat view of the cardstock case. Dashed lines indicate folds. The light gray areas are the spine width portions of your case. The dark gray areas are those portions you must cut away. Read below for more instructions.
Yesterday’s post took you through some of the pros and cons of making slipcases for your journals and then presented tips on selecting paper and using the few tools involved in the process. It should be a simple matter then to look at the template provided and work through it, with the other tips in mind, to a completed case. Remember that practice will improve your cases. Be patient. Work methodically so that you can alter your process as needed the next time, because you were aware of your process the first time.
Making a Simple Slipcase for Your Journal
1. You have selected a suitable cardstock and decided which way you will fold it. You will then begin by cutting a straight line along the width of your entire case (item 1 in the diagram). You do this so that you have a crisp clean edge to measure from. (Note you will need to start with a piece of cardstock that is wider and taller than what you need when finished because you will be trimming!) Height = book height + (1/16 to 1/8 ease) + (2 x spine width); Width= (2 x book width) + spine width.
2. You have your measuring strip with your spine measurement, book height plus 1/16—1/8 inch (you need this extra space in the height to accommodate the thickness of the folded over cardstock), and book width all on it. (As described in yesterday’s instructions.)
3. Position your measuring strip so that the first spine measurement mark lines up with the edge of the paper (the line you cut at step 1). Follow your measurement strip down to the next spine width measurement and transfer it onto your sheet so that you can mark the spine width at point A. Repeat at point B.
4. Position your straightedge to line up points A and B and score and fold your cardstock along the dashed line in the diagram. Follow procedures for scoring and folding from yesterday’s post.
5. Position your measuring strip so that the height measurement starts at this fold and then mark the height at point C. Repeat between points B and D.
6. Position your straightedge to line up points C and D and score and fold your cardstock along the dashed line in the diagram.
7. Position one edge of your spine measure from your measuring strip at point C and measure the spine width down to point E. Repeat by transferring this same spine measurement between points D and F.
8. Position your straightedge to line up points E and F, and this time CUT along this line using an X-Acto.
9. Using a triangle or a transparent quilting ruler, line up your tool vertically from the top line cut in item 1, at the left of your sheet. You are going to drop a vertical line from this first cut. It needs to be vertical so you must create a 90 degree angle. This is the one time I find a triangle useful, but a transparent quilting ruler also allows you to align the rule with the top line and drop a 90 degree vertical. If you don’t have such tools you should be able to find something hard and flat that has a right angle on it that you can trace. Trim a vertical line at this edge, dropping through point G.
10. From point G to H apply your measuring strip and transfer the book’s WIDTH. If you have a triangle, base align it with your top line (1) and drop a vertical line to run through H. Score and fold. If you don’t have a triangle I recommend that you mark the book width at two places, measured from the left edge in. When you connect those two points, if your left edge is true, your next score through those two points will also be true.
11. Measure from point H to I with the SPINE measurement on your measuring strip. Use a triangle to score a vertical line through point I or follow the advice in step 10.
12. Measure from point I to J with the WIDTH of the book on your measuring strip. Use a triangle to drop a vertical line through point J and CUT this edge, or follow the advice in step 10 to use two points to locate your line, and then cut.
13. At points K and L use your X-Acto to cut away the dark gray triangles. You are leaving a pointed triangular flap attached to the vertical spine of your case. You want this because it will fold over and create a “seal.” Without it there will be a gap at this point in your case which makes it weaker and also less effective in protecting your book form dust and grit. Be careful when cutting at these positions. I like to put the tip of the X-Acto blade on the fold line and cut out, thus ensuring I won’t cut down into the case.
14. Fold the HEIGHT portion of your measuring strip in half and use that new point on your measuring strip to mark the halfway point of height on the left and right edges of your paper. Position a CIRCLE punch at this halfway point so that the punch is half on and half off your paper. Punch to create a 1/2 circle punch which is your thumbcut. This will make it easy for you to grab your book and pull it out of the case. You should make these thumbcuts now as they are difficult to do when the case is glued. If you don’t have a circle punch of the correct size then find a round object and use it to trace a half circle on each side, and cut away with an X-Acto. Your thumbcuts go at points M and N on the diagram.
15. Now it’s time to glue the case. I pour a little PVA onto a piece of waste bond and use my finger to apply the small amount of glue needed to spread over the flaps. If you prefer, get out a glue brush. With my approach, I simply wipe off my finger and toss away the glue covered sheet of paper. Now look at the second diagram on folding.
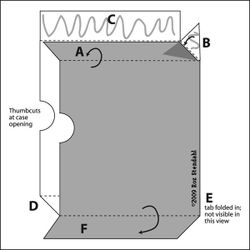 Left: The folding diagram shows how the flaps fold in to create the case. The squiggly gray line is a line of glue (which you should smooth over the entire surface). Again, dashed lines indicate folds. Read the text for directions.
16. Fold in the head flap A. Then glue the underside of triangular flap B and fold it down. Press it into A, keeping A in position so that the edge of A is still right next to the fold line of the opposite flap (there is a tendency for people to let the triangular flap slide on flap A, this will result in a misaligned case). I hold the triangular flap until it is set but not dry. If you remove your fingers and it moves, hold longer. Sixty seconds is usually sufficient.
17. Rub glue on the inside of flap C, smoothing it everywhere. Fold flap C down to meet flap A. Triangular flap B will be sandwiched between the two longer flaps.
18. Flip the case so that the glued portion is facing down and using your bone folder, reach into the case and press down on flap A from the INSIDE OF THE CASE, pressing it to seal it with the other flaps. You are pressing down on these flaps as the rest on the table. You should not use so much glue that there is a lot of seepage, but don’t worry if there is a little glue seepage. Your main concern is to make sure the flaps are sealed together.
19. Repeat the process on the other end (head or tail, whichever you didn’t already do) of the case, with ONE EXCEPTION. Reverse the flap that is outer most (or last to fold in). I have found this makes the case look better and is a bit stronger as well. See in the diagram that flap A folded in at the head, and C covered it, so at the tail, the opposite flap (D) is folded in first, and flap F (which is on the same side as flap A) will cover D. (Don’t forget that the triangular tab E gets folded down after D and before F, so it is sandwiched in between.) Glue as for before, and again, reach inside your case with your bone folder to smooth out air bubbles and ensure contact. Note that it will be more difficult to get your hand into your case now, because the other end is closed. You can allow the sides to bend gently, but be careful not to crease them. If you have big hands you’ll need to make some sort of extension tool for your bone folder, or always bind thick books with wide cases!
20. RESIST THE URGE TO INSERT YOUR BOOK into the finished case. Even if you didn’t feel glue seeping inside past the flaps there might be some there. Set the case aside until you know the glue is dry (this will depend on the humidity and temperature in your studio—an hour should be sufficient).
21. Once the case is dry, insert your book.
Advanced Option
Adding a ribbon pull—If you want to add a ribbon to your case
that will dangle at the tail of your case opening and allow you to
pull the ribbon and dislodge the book, you must attach the ribbon at
the HEAD of the case, after you fold flap A down, and before you fold
triangular flap B down (Step 16). The ribbon actually anchors there, then trails
down the back inside of the case and along the inside tail of the case
to exit just about where label D is in the second diagram. The ribbon
must be long enough to anchor well at A and B (2 inches there is good)
and run the height and width of the book, and then out the case opening
with sufficent length that you can grab it and pull—not so short that
it can get crammed into the case. I find it is always best to err on
the generous side and trim after the book is inserted into the case.
Also, I carefully fold my ribbon into a small loop which I cover with
waste paper and tape shut, with only the two inches for gluing
extending past the package. I then attach the ribbon end to flap A,
dangle it down into the case where flap B is, before flap B is glued
down. The “package” of ribbon is thus out of the way and protected from
glue. (It can also be further kept out of the way by taping the ribbon package to the inside of the case with blue painter’s tape which releases easily.) Left to its own devices the ribbon otherwise gets messed with glue when doing the tail flaps. And that glue always falls on a portion of the ribbon that will extend outside the case and be visible. Do yourself a favor and protect your ribbon. If you’re just starting to make cases omit this feature. The thumbcuts are sufficient for easing your book in and out of the case.
As mentioned before in my post on unbound journals, slipcases and portfolios to hold your book can be elaborate constructions of binder’s board and bookcloth. Please look in the “Pages” section of this blog (column at the left) for “Essential Bookshelf for the Bookbinder” which lists recommended books on bookbinding, many of which detail instructions for a sturdier slipcase. My intent in creating this type of case for my journals was to make something that was quick, inexpensive, and sturdy enough to protect the journal during its working life.






Hi Roz,
I have been reading your posts on the slip covers. This is great! A few months ago I purchased two custom made watercolor journals from a bookbinder on Etsy. They were exactly the size I wanted (5.5×7.5), with the exact paper I wanted (Aquarius II), with a combined Coptic and Celtic weave binding (absolutely beautiful and very pleasing aesthetically). I was so excited when I received them. But I have hesitated using them because I was afraid they would get demolished by my stuffing them into and carrying them around in my large handbag.
I am currently using a Hand*Book Journal, which can actually take a lot of abuse without showing much wear and tear (so far). I tend to use A LOT of water, and while I usually don’t mind the pages buckling, sometimes the watercolor techniques I’m trying to practice don’t come out right because it is not actual watercolor paper.
I have also read your post about “The Best Compliment You Can Give a Bookbinder”, and have felt so guilt ridden for not using my journals. So, I think your idea of making a sturdy, durable slip cover for my custom hand bound journals may be just what I need!
Thank you so much!!!
:o) Wendi