Update: December 22, 2022
I wanted to get this revised page up so people new to binding could have access to it, even though posts from October 2009 to December 2020 are now in a non-public archive.
This post contains the essentials of determining grain direction.
The links in this post however are not updated yet and those posts will not be available to you at this time. I do not have a set schedule for updating, I appreciate your patience.
Photographs in this post will NOT enlarge. If you click on them they will simply open a new window with the same post. It is an artifact of the Typepad platform formatting and coding of images. You will still be able to follow the discussion with the photos at the size presented.
Methods for Determining Direction of Paper Grain
The other day I was asked how to tell grain direction in a paper you aren’t familiar with. Why the need to know paper grain direction? Well if you are a book binder you want to fold the paper you use for your text pages WITH THE GRAIN. They will fold better this way and you won’t be cracking and re-cracking the fibers every time you turn over a page. Additionally, when you make a casebound book you are gluing several materials together and you want the grain of all those materials (the binder’s board, the decorative paper for the cover, the decorative paper for the endsheets, the text paper, and the bookcloth) to ALL run parallel with the spine direction. Otherwise you end up getting some interesting warping issues which can pull the book structure apart.
Note: I have dealt with the practicalities of tearing down paper with the grain in a number of posts. I mention one below. Another post you might want to read is Adventures in Bookbinding: Matching Surfaces across Spreads. In that post I show a tear diagram. Along with the other notes I suggest below that you keep, I recommend that you make a tear diagram for every sheet of paper in the way you use it for your favorite sizes of books. You might have 3 tear diagrams for one sheet of paper because you love to use that paper so much in different ways. Having these diagrams will save you time when you are thinking about the size book you want to make and the possibilities of making that book with a given paper.
Now that you know it’s important for a bookbinder to know the grain direction of a sheet of paper, it’s good to know there are a number of ways to determine grain direction. The easiest is to read the manufacturer’s specs on the paper. Most paper stores will have brochures from the companies. These brochures will list these specs and the store staff can help you with these questions. (Another reason to go to an independent art store that keeps this material handy.) Sometimes catalogs will mention grain direction because some customer has convinced them it’s useful.
But if you have done what you can for research and still don’t know there are a couple tests you can do to determine grain direction. Here are some suggestions:
Non-invasive:
1. Put the sheet flat in front of you and gently pick up one end and loosely flop it over to make a big CURL. (DO NOT FOLD IT.)
2. With the palm of your hand GENTLY push down on the large curl and judge how springy it is. Does it compress easily? Is there a lot of resistance to the gentle pressure?
3. Make the paper flat again. Now pick up one of the sides that is perpendicular to the side of the sheet you first picked up. Gently flop it over into a large curl.
4. Repeat the gentle compression with the palm of your hand. Does this direction compress more readily? Is there more resistance to the gentle pressure than you felt when you worked in the other direction?
5. Based on this test (and sometimes you have to go back and do the first operation again to compare) you will know which curl compresses with the least resistance. That is the way the direction of the grain runs on that paper. So for instance, if you have a 22 x 30 inch sheet of paper and you flop over the 30 inch side and compress, then go flat and flop the 22 inch side up and compress and find the latter has more resistance you know that the grain runs with the 30 inch side of the sheet.
The non-invasive method is sometimes difficult to judge when working with ultra thin papers.
Invasive Method One—Water:
I have written about the water test method in my “Tearing Down Fabriano Artistico.” The following series of photos taken today show what I mean.
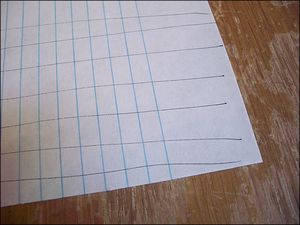
Note: October 6, 2010 A reader asked me about paper grain and in referring her to this post I reread it and realized that choosing a piece of note pad paper with light blue lines printed on it may be confusing. No one screamed when the post was originally published so perhaps everyone saw those were blue printed lines on the sheet. Pay attention to my waterproof ink lines running horizontally for this discussion.
Photo One: Mark your sheet with pencil lines (or waterproof ink lines) in one direction as shown in the photo.
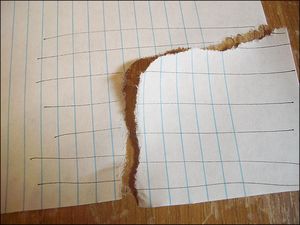
Photo Two: Tear the corner, where you have marked your lines, out of the paper as shown. You want to leave some of the lines visible on the sheet and some on the scrap. The lines are there so that there is no confusion as to how the scrap fit into the full sheet. You also want you scrap to be approximately square as a rectangular shape might influence or confuse your results.
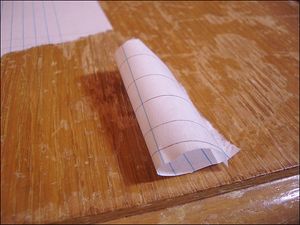
Photo Three: With water mist ONE SIDE ONLY of the scrap of paper. (If you have used pencil or waterproof ink you won’t have a mess on your hands. Also if you don’t have a mister you can gently smooth your wet finger across the surface of the scrap—but don’t rub the water in.) Set the scrap down on the table. Depending on the thickness of the paper it may start to curl immediately, or it may take a moment. Stay close by. Some papers, after they have curled, settle down almost flat again when dry. You might be confused (or no more enlightened) if you return when the scrap is dried out. With a few seconds or a minute or so the paper will CURL. The cure is telling you the direction of the grain. I think of it this way: that curl makes a tunnel through which the grain travels. (Note in my example the paper was so light that it curled into a tight roll. Some papers will only mound up a little, showing you where the “tunnel” is.)
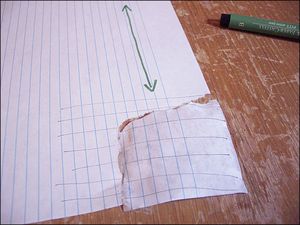
Photo Four: Put the paper scrap next to the full sheet, with the lines on the sheet and the scrap aligning. (Note, in the above photo I have had to uncurl the paper a bit to show you how it lines up.) Now you can see the curl of the scrap in relation to the the full sheet. You can see the grain running through the tunnel of the curl and that points out your grain direction on the full page, as indicated on the sheet with the green arrow.
You will want to write down on your sheet an arrow and notation like this and save the sheet for your reference. (It is also good for noting changes in paper color and sizing over time when compared with new batches—because remember paper changes, they work to tolerances and your next batch of paper will be different.)
Invasive Method Two—Tearing:
Paper tears easier when it is torn WITH the grain. This is because the fibers in the sheet are aligned and you are essentially tearing with them as opposed to tearing across those fibers.
This method also “wastes” a sheet of paper.
Take the sheet you are testing and fold one edge in about 1/3. Give it a good crease with your bone folder. Don’t over work it. Then tear the paper with your bone folder by sliding it up the fold if you know that technique (it’s something I’ll have to do on a video sometime) or open the fold and pull the paper apart at the crease. Remember how easy or difficult this was.
Next fold the sheet about 1/3 in from an edge that was perpendicular to the first edge you used. Do not over work the fold. Give it no more and no less attention with the bone folder than you did your first fold. Now use your bone folder or hands to tear at that fold. Is it easier to tear that fold than the first fold? If so the grain direction runs with that fold. If it was more difficult to tear the second tear the grain direction runs with the first fold. Mark grain direction on your sample paper.
Another thought on tearing: some people can tell the paper grain by simply tearing off a minute corner of a sheet so that they have the experience of tearing it in both directions. The visual smoothness or roughness of these small tears is sufficient. The sheet is still marred so I prefer more sure approaches.
Another Non-invasive Method with Which I Can’t Help You:
I’ve heard tell, that you can pinch your fingernails together and run them along the side of a sheet and see how the edge curls and based on that you can determine grain—but I have never seen anyone do this method. My fingernails are never long enough to do this method. If you have fingernails you might want to track this method down—button hole some long-lived bookbinder at a convention and make him demonstrate it for you. It leaves the sheet usable in its entirety.
Note Keeping:
Once you determine grain direction on any sheet, regardless of the method (direct information from a manufacturer or one of the methods above) write that information down—you should make yourself a chart for future reference. But then you should also realize that manufacturer can change things up (change machinery for instance) and that will change your paper. See my write up on Tearing Fabriano Artistico Watercolor paper for just such an example.
I keep a worksheet on all the papers I work with—I stopped counting at about 80. I write down the paper size in my notes and I underline the number that represents the grain direction of that sheet. So for instance if a paper “pressure” test shows that there is less resistance with the 30 inch direction, then 30 will be underlined in the measurement.
Hand-made Paper Issues:
Hand-made papers are made when a slurry of fibers is picked up and shaken in a screen. The fibers align in every direction during the process and paper grain is not an issue with such papers. Folding may still be a problem because of sizing, e.g. there might be so much sizing that there is cracking when you fold the paper regardless of direction in which you fold it.
Sizing Issues:
Arches watercolor paper comes to mind as a paper with a “sizing issues.” It does have a grain direction, but it cracks when folded with the grain because it is so intensively sized—a good thing for painting, a bad thing for folding papers when making books. Even the 90 lb. Arches Watercolor paper cracks when you fold it with the grain. I don’t use Arches watercolor papers for book making at all.
Labeling a Sheet of Paper or Binder’s Board:
When buying binder’s board I recommend you ask the vendor for the grain direction. It’s difficult to determine by the standard methods.
Once you know the direction of the grain on binder’s board I also recommend that you take a soft lead pencil and mark the board across the entire surface with light (so you don’t mar the surface), but visible lines in the direction of the grain, from one edge of the board to the other. I recommend lines approximately 2 to 3 inches apart.
These lines will then tell you at a glance the grain direction for that board, when you are cutting your cover boards. (Remember you want the grain direction to run parallel with the spine so if you are cutting the width of your cover boards and the lines aren’t running up and down vertically in the board shears in front of you, your mind will kick in and stop you from making those cuts and wasting that board.)
Grain direction lines on your binder’s board also come in handy when you are making square or nearly square books and are constructing the case—the lines give you immediate feedback on how to put the pieces together when height and width are close to the same.
Also, in the bookmaking process there are often scraps left over—usable scraps. However, if those scraps are not “labeled” in this way you will have to use valuable time determining grain direction, and even then not be sure. Better to know.
I make my own paste papers and decorative papers for use as cover papers and endsheets. I mark all these sheets in the same way as I described marking the binder’s board. Again, the marks are always light enough so that they don’t mar the surface of the paper (because for these papers that would result in an impression that would pop out on the decorative side. You also want to mark lightly so that your lines don’t show through light weight sheets. In this way I don’t have to worry about determining paper grain direction on a large scrap of paste paper, where the paste interferes with the tests, and so on.
I hope this has given you an idea of how to proceed. Happy note taking!









Thanks for being consistent source of information on bookbinding….as well as other things visual arts related! (That’s got to be a grammatical mess!)
Carol, I’m glad it’s helpful. I hope people get interested in making books!
Marsha, thanks for bringing up a really good point. Yes, it’s applicable. You can score it first when folding against the grain.
Here’s my problem with that and why I don’t do it when folding paper. I like to do a straight fold and no waste, or take the waste off first—and for that fold, because it has to be measured, I will measure, score and fold.
But you know me, I’m too interested in doing things quick and simple to stop and measure and score and fold for the other folds which really could be simply done by folding in half (the remainder of the sheet after the waste is gone).
People interested in marginal papers should by all means try this because it might just make that paper that was marginal actually work for them.
Thank you for suggesting this.
Thank you for the example. I was every time confused, which side is grain direction. Now it’s clear to me.
Niladri, I’m so glad this was helpful! Yesterday before teaching class I had a thin sheet that I needed to find grain on and had to resort to the tearing out of a corner and wetting it. Useful to be able to have a test for those moments.
Thanks, glad I found this post. Just starting some bookbinding projects and was totally lost about grain. Watched several videos but still none explained as well as you. The “tunnel” explanation is especially helpful.
Glad that this was helpful.