Post contains tips on altering your journal’s cover.
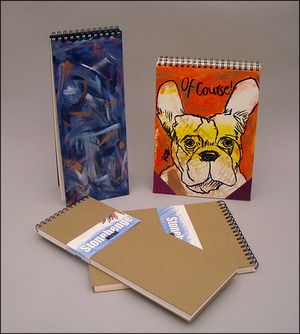 Left: Stonehenge wirebound journals that have been painted. (They come with naked boards.)
The great news is that since I first reviewed the new Stonehenge journals from Legion Paper they have added a new size to the line up: 7 x 7 inches. This means that journal artists who prefer a more portable journal size have an option. (Other currently available sizes include the 9 x 12 and the 6 x 15 inch.)
Also new with the 7 x 7 is a round hole instead of a more rectangular hole for the wirebinding. I know it’s a small thing, but I like the crisp aspect of the round holes, and they visually seem to take up less of the live area of the page, so I hope this change is permanent.
Legion still seems bent on going after the pad market, treating the orientation of the wirebound journals as pads with all labeling echoing the top placement of the wirebinding. There is a debossed logo (the word Stonehenge) on the back cover now, which also echoes this “put-the-wire-on-the-top placement,” but even if you don’t paint over the logo you can ignore the packaging and turn the spine to the side and treat it like the book you’ve always wanted to have—with Stonehenge paper.
There are still 32 sheets in each book so they are perfect for a page-a-day in any month, with one page left over for use as a title page.
And of course there are the naked covers inviting you to express your individuality.
I promised in June, when I first reviewed this product, that I would share some tips on altering the covers. Monday night every member of the MCBA Visual Journal Collective received a 7 x 7 inch journal from Stonehenge so it seems a good time to post those tips. (I’ll be posting more about the great travel journal meeting we had on Monday night tomorrow!)
If you are going to paint or otherwise alter your cover I recommend that you do it when you start your journal, as the paint, fabric, and paper you add to the cover will actually help maintain the integrity of the board covers by sealing them.
If you are going to use 3-dimensional items on your cover I recommend that you save those for when you have completed the journal. Turning the covers and pages back on themselves for easy sketching and painting will be more difficult if you have lumpy stuff on either cover. Weighting collage materials in the interior of your book will also require a bit more strategic planning if you have bulky items on the covers.
In the two painted samples shown I took two different approaches. For any approach, however, I recommend that you wrap the interior pages, just as you would a gift, with clean waste paper.
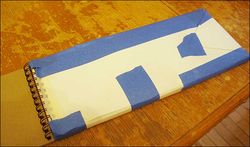 Left: Wrapping your pages before you paint the covers. Keep tape around the spine edges at the top and bottom. This is a place your brush is likely to slip. A bit of masking tape along the wire edge will also help minimize random strokes on your pages as you paint near the spine. That line of tape will also hold the wrapping in place. Use tape that will not mar the paper surface when you remove it. Remember that during the lifetime of your book you’ll be painting the other pages and slips of the brush are likely to happen. Don’t sweat them. Wrapping your pages actually helps you move the covers about quickly without worrying about dirty fingers and such.
Also, it is important to keep the moisture content of your brush and your paint at a minimum. You want to seal the covers, not dissolve or buckle them with excessive liquid.
6 x 15 inch, Abstract strokes cover
The easiest way to cover naked boards quickly and give them protection from wear and the elements is to coat them with fluid acrylics (I like Golden—they are worth the little extra that you pay because of the high quality of the paint).
With my interior pages wrapped, I opened the cover across some waste paper and painted in a quick but thorough (checking for gaps in coverage) way. I used a large flat brush for the initial coats. I kept little to no moisture in my brush. I used the fluid acrylics undiluted.
I poured a 50-cent piece dollop of each color I was going to use on a porcelain palette. I dipped my brush in as needed, not worrying about contaminating the colors—during the process the colors all mix anyway.
For this cover I used blue for the background. Every so often I used a slight bit of white on my brush to lighten up the color. I worked in broad strokes all the way off the edge of the boards. And I worked quickly. When the surface was covered I made sure that the edges of the cover were coated with paint by running a paint loaded brush along them. Then I dipped into the other colors I was using, red and white, as desired to change the colors of the still moist blue paint, as desired. I built up strokes in a random and playful way, adding a little more of this and that as desired. I switched to a smaller brush to get narrower strokes. I also worked on both exterior covers at the same time so that I could match the color used across both surfaces. This process took about 5 minutes.
It is important to cover your edges before you do the final strokes of your flat surface because ridges of paint may form on the edge of the cover. You can easily hide and smooth these out with strokes on the flat surface, working towards the edges, if you’ve still got work to do on the flat surface.
Keep your colors to two or three colors. Analogous colors are great. Using white is an nice addition because you can play with taking the colors into tints. Using complementary colors can lead to some interesting neutral passages that will make the areas of non-neutralized color pop.
Once you have finished the bulk of the cover it’s time to decide how fussy you want to be around the holes of the binding. Because I was going to photograph these samples I spent a few moments with a thin round brush, injecting paint into this area—first the blue, and then the other colors for blending. I even took time to seal the spine edge of the cover boards. (It is actually useful to seal this edge because during the course of the life of the book paint from your interior pages may hit this edge.)
Since you are working with basically no water the paint will dry quickly and by the time you are working on the spine you should be able to hold the book in your hand juggling it so that you expose the area you wish to paint on the spine edge. Be sure to work over onto the inside cover portion of the cover holes. Repeat for the other exterior cover board’s holes. Set aside to dry
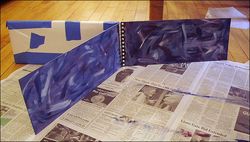 Left: The completed exteriro covers actually match in color—the back cover here is getting more light. Painted they are left to dry in this fashion if needed, before continuing on to paint the interior covers.
In about 10 minutes you’ll find that covers are certainly dry enough to work on the interior cover sides. I actually found that by the time I had finished the fussy work of painting around the holes the cover paint was dry enough for me to continue working on the interior.
Since I had already worked over the holes at the end of the exterior cover paintings steps, all I have to do is check that the fore edge, head, and tail edges are all sealed and then simply paint the flat interior cover surface—just as I did the exterior covers, or in some other way of your own devising (there’s no rule about having the interiors match the exteriors!).
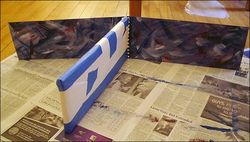 Right: I complete the interior covers with the same palette of colors and approach.
Stand the covers to dry as shown in the image. If you are unsure of the dryness of your edges, then stand the book up on a large sheet of wax paper.
Take a moment to rub paint off the wirebinding with a soft cloth, if that bothers you—frankly you’ll probably get paint on the binding when you work through your journal anyway, so you might want to skip this.
I let such covers dry overnight. Before removing the paper wrapping I always check that no touch ups are needed.
In this instance I decided that I would like some copper metallic accents. I stroked these onto the exterior covers with a dry brush. Since all the other paint was dry there was no mixing of the metallic paint with the original layers and it remained undiluted, unmuddied, and brilliant—or as I like to say, it’s a “bright sparkly.”
Gessoing Your Covers
Perhaps you want to do more painting on your covers. Maybe you want to use a variety of mediums for texture, along with your acrylic paints.
If that’s the case I recommend that you first cover the boards with gesso. This will give the ultimate seal to your boards. (It also adds several steps and time, but it yields more options later.)
1. Wrap your pages as before.
2. Using a flat brush (a housepainting brush is fine) coat the exterior covers just as explained for fluid acrylics, except of course this time use GESSO. In general I think you’ll find this will take a little longer to dry. You might need to set it aside before continuing on the inside covers with gesso. Be sure to cover your fore edge, head, and tail edges.
3. Cover the inside covers with gesso.
4. Cover the holes and spine edge with gesso.
5. If you intend to use acrylics in a watery fashion on your cover (and that can be quite attractive) I recommend that you repeat the gessoing process at least two more times, allow the covers to completely dry in between coats. 30 to 60 minutes between coats is typically sufficient in all but the moistest of environments.
Note: I recommend that you work with acrylic paints on your book covers because they dry quickly, provide a bit of sealing, and also are waterproof when dry. If however, you really must use watercolors on your cover, AFTER completing two layers of gesso on your cover add a third and final layer of absorbant ground (I recommend Golden). This should be applied only when the gesso layers are fully dried. Absorbant ground allows you to paint with watercolors using the same types of techniques you would on watercolor paper. I recommend that you spray seal your final watercolor work, however, because remember watercolor work is always watersoluble and you’ll be handling your book a lot. There are a lot of resin type sealers available on the market. Spraying it on will eliminate the danger of disturbing your painting with brushstrokes.
6. Once the final coat of gesso is dry paint and decorate in any fashion you would employ on a gessoed canvas. Add thick media with impressed textures, 3-D items, etc. if desired.
9 x 12 inch with Bull Dog on Cover
This cover was completed using the Gesso-first method.
Once the gesso was dried I did the following:
1. I put a bit of Daniel Smith Acrylic Metallic paint out on a flat sheet of acetate and rolled a textured brayer through the paint. I then rolled the paint ladened brayer onto the gessoed surface of the covers.
2. I used a brush with a mix of slightly diluted blue and burnt orange fluid acrylic paint to sketch the dogs. I was working from previous sketches. You could also take a copy of a sketch and transfer it onto your cover using graphite transfer paper.
3. Knowing where the dog faces would fall I took a flat brush and dipped it in diluted yellow fluid acrylic paint and made strokes across both covers. I restated some of the outlines.
5. Instead of painting each face up to completion I decided to paint the background, again with fluid acrylics.
6. I wanted some text on the cover. Since I had limited space on the covers I place a piece of acetate over the covers to experiment with placement of text. I painted on the acetate, through which I could see the entire cover. When I settled on a style and placement I liked, I removed the acetate and painted in the text, using fluid acrylics.
7. I cut triangles from bookcloth and glued them to the corners with PVA glue. I first marked their position in pencil so that they would be balanced across the cover. When they were dry (about 10 minutes) I opened the covers and turned the corners in just as I do when I cover bookboard on a handmade journal.
8. The inside covers of this book were left with only the gesso layers. I decided I would add to them as I worked in the book.
There you have it—two simple ways to customize your journal cover.
If you are working with journals that have bookcloth-covered boards or some sort of debossed, embossed, coated cardstock type surface you can still use these methods as a base for your own artwork experimentation.
I recommend that if there is any type of paint or ink or coating on the boards you’re working with that you sand them lightly first and then apply your first coat of gesso.
Whatever you do, until you have some gesso down, keep the moisture in your brush and paint to a minimum.
Something to remember: It is important to treat both sides of your cover boards. If you only treat one side, the paint and gesso you apply to the front of your boards will cause the boards to warp. Painting and/or gessoing the opposite side of the board balances the tension. It also completes the sealing of your boards and creates another surface on which you can paint your heart out!
If you are working with the Stonehenge wirebound books I would love to see how you alter and decorate your covers—send me a note and a jpg.
Note that Stonehenge wirebound books are available already in several locations. (Wet Paint in the Twin Cities has them.) Ask your vendor about them if you can’t locate them. It’s a new product and is being released in more location every week.








Roz, I love your idea about wrapping the inside pages of your journal – I never take the time to do this – at a minimum I place a piece of wax paper between the cover and pages but I really like this wrapping technique and will do it next time I decorate a journal cover. I have a tip for those that use watercolor as I do – you can use wax (just plain old furniture wax) to seal watercolor and your paints won’t move. Just apply the wax with a soft rag and follow the directions – it usually takes 10-20 minutes for the wax to “dry” and then you buff it and it creates a nice shine and some depth. I’ve used it several times for covers (you can see an example on my blog right now – the first post and I used watercolors and wax on a very thin cover) and on watercolor paper. If the paper is white it may discolor the paper to look a little more aged but I don’t mind that.
Hey Roz, Great info thank you so. How are you feeling? Just checking in and hope youre having a great day,
lINDA
Great Lynn. I look forward to seeing it—bring it along to a Collective meeting!
Linda, thanks, as to how I am, it’s a long story. I’m still getting over pneumonia. I have a post about it going up probably this weekend. I get a little better every day but my energy is low, so little typing.
Sandi, thanks for your point about waxing your cover. People who don’t want the “aging” effect (and I agree with you that’s no big deal) and who want to stick with archival materials to cover their watercolored covers can also use Dorland’s Wax Medium or MicroGlaze. I use the latter on my paper jewelry that I make.
Roz, I’ll check those products out. I have a web site of a place that sells archival wax I just haven’t taken the time to purchase some but I’m going to check Dorland’s Wax out. Thank you! I should have known you would know about some great product! Have you been going crazy with the video camera? I hope you have :)!!!
Sandi, sadly, no I haven’t been doing any videos yet. I’ve been too sick and couldn’t talk without coughing. I sound enough like a cartoon character without additional quirks!
I hate that the time was all scheduled and that everything is lying about in piles waiting to be filmed because I’m prepping for my class on Saturday and between the two there is just no space anywhere. Not to mention the pile of books I wanted to review and 25 sheets of Gutenberg which came in yesterday and needs to be torn down into signatures as there is no space in the flat file, but good luck with that because the work table is heaped full of video prep stuff.
URGH. It’s enough to make me start coughing without even speaking!
OK so let’s take the pad with the abstract design. If you do something on the outside, you also paint the inside cover so the boards don’t warp. I’m with you that far. You also seal it somehow? I didn’t see that step. Cos’ I’m wondering how you keep blue paint off the first and last pages once it’s dry and the pages are unwrapped. A certain amount does rub off.
Roz, you always crack me up! I’m so sorry you’re still sick! I pray you get better quickly friend. One good thing about sickness – it makes us appreciate our health much more doesn’t it?!
Chris, sorry all this wasn’t clear.
I’m glad you got to the balancing of the boards and no warpage.
As to sealing it you don’t need to seal acrylics. I do this all the time with fluid acrylics and I don’t get any rub off on the title page or last page during the month I might be using the book. I may just be lucky, or maybe the book doesn’t get enough wear because it’s only in circulation a month? Don’t know.
If you are concerned with the paint rubbing off you can seal it with something like Microglaze, which is a wax I mentioned in another comment when Sandi was talking about sealing watercolors.
Or you could put a layer of clear medium over it—but frankly I think that would be over kill and maybe even tacky in a tactile sense—I rarely use acrylic mediums and full-bodied acrylics in my journals as I find they sometimes cause pages to stick, whereas I never have this problem with fluid acrylics.
It might also be the brand I’m using—Golden. It’s high quality and if you have rub off and are using a different brand I would suggest first switching to Golden Fluid Acrylics before messing with trying to seal things.
Hope that helps.